A Heat Map widget is a combination of colored rectangles, each representing an attribute element, that allows you to quickly grasp the current status and impact of a large number of variables.
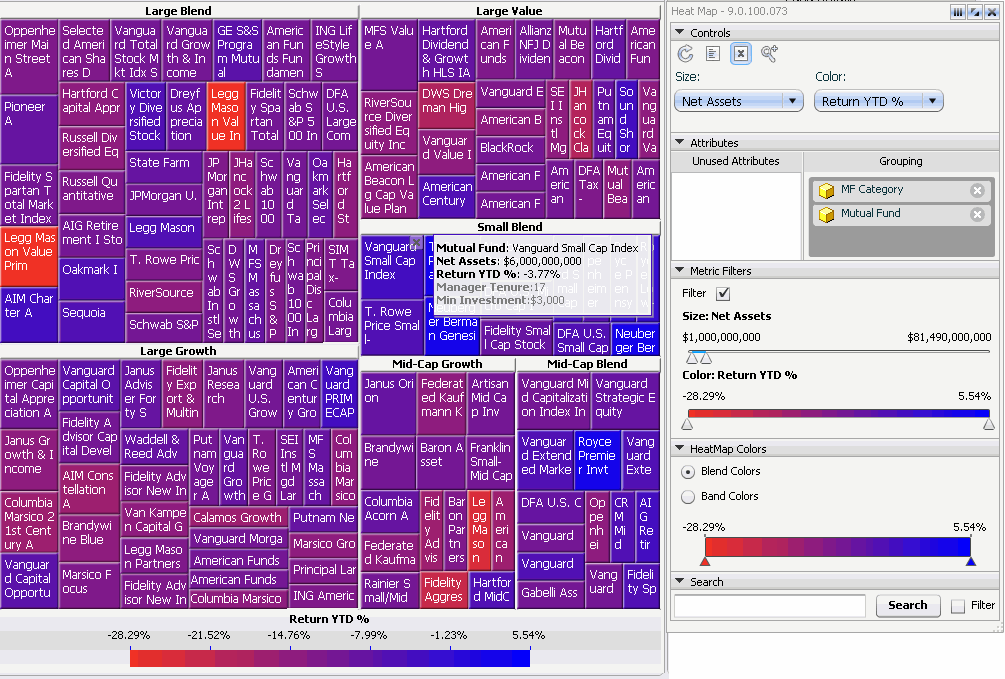
The headings along the top of the rectangles represent a set of attributes. In the example below, Large Blend and Large Value are two of these headings.
The individual rectangles under each heading represent a single attribute. In the example below, this attribute is Mutual Fund, as shown by the individual mutual funds displayed in each rectangle beneath each heading.
The size of the rectangles represents a specific metric. In the example below, the metric is Net Assets.
The color of the rectangles represents a second specific metric. In the example below, the metric is Return YTD %.
When you hover over a rectangle, data is displayed in a pop-up. In the example below, the Vanguard Small Cap Index data is displayed.
Note: To successfully analyze a Heat Map widget with large datasets, Flash Player version 10 or later must be installed on your computer.
You can analyze data in Flash Mode and in Interactive Mode (if the widget is defined to display as a widget in Interactive Mode).
To analyze data in a Heat Map widget, open the Heat Map dialog box by right-clicking the widget and selecting Interactive. The Heat Map dialog box opens. Use the dialog box:
To return to the widget as defined by the Grid/Graph, click the Refresh icon and select Default Configuration.
To return to the last saved version of the widget, click the Refresh icon and select Saved Configuration.
To allow
you to delete rectangles, which provides additional room for other rectangles
or eliminates outliers, click the Enable
Delete icon. When you hover the cursor over a rectangle in the
Heat Map widget, an X appears
in the top right. Click the X
to remove the rectangle from the widget.
To disable deleting rectangles, click the Disable
Delete icon. To replace any rectangles that you removed, click
the Refresh icon.
To display a list of deleted rectangles, click the List of Deleted Items icon. A dialog box opens, displaying all the deleted rectangles. Click the X button to close the dialog box.
To view
details of the data within a rectangle, click the Zoom
icon. When you hover the cursor over the Heat map widget, the cursor turns
into a magnifying glass. Click the rectangle that you want to zoom in
on.
The path that you are creating is displayed at the top of the widget.
You can click a step to return to that view of the widget. For instance,
to return to the full view of the widget, click Home.
To turn zoom off, click the Zoom
icon again.
To change the metric that determines the size of the rectangles in the Heat Map widget, select the metric from the Size drop-down list.
To change the metric that determines the color of the rectangles in the Heat Map widget, select the metric from the Color drop-down list.
To focus on the data on a specific attribute, you can remove other attributes from the widget. You cannot remove all the attributes from the widget; at least one must remain so that the widget can be displayed.
To remove an attribute, drag the attribute from the Grouping list to the Unused Attributes list.
To replace
an attribute that you removed, drag the attribute from the Unused
Attributes list to the Grouping
list.
Note: If the Unused
Attributes list is not displayed, removing attributes is
disabled. For instructions to enable this option, see
Formatting
a Heat Map widget.
To rearrange the grouping of categories on the Heat Map widget, click and drag attributes in the Grouping list. The attribute at the top of the list creates the headers in the Heat Map and the attribute at the bottom creates the individual rectangles under each header.
To display rectangles based on the metric values that determine size, move the sliders for Size.
To display rectangles based on the metric values that determine color, move the sliders for Color.
To display only the rectangles in the Size and Color ranges, select the Filters check box. If the check box is cleared, those rectangles are highlighted. This allows you to see how your choices affect the widget.
To blend the colors between points, select the Blend Colors check box.
To display a specific color for a specific range, select the Band Colors check box.
To add a new point when the colors are blended, click the slider where you want the new point to appear.
To add a new band when the colors are banded, press CTRL and click the slider where you want the new point to appear.
To move a point or band, slide the point or band to its new location. As you slide it, the metric value is displayed.
To delete a point when the colors are blended, click the point and drag it off the slider.
To delete a band when the colors are banded, hover over the band and click the X that appears.
To change the color of a point or band by double-clicking it in the slider, select the new color from the pop-up dialog box which opens.
To have the color of a band become darker towards the right, click the arrow at the bottom of the band until it points towards the right.
To have the color of a band become darker towards the left, click the arrow at the bottom of the band until it points towards the left.
To have the color become darker towards both ends of the band, click the arrow at the bottom of the band until the arrow points both ways.
To display a band as a solid color, click the arrow at the bottom of the band until it becomes a circle.
To find an attribute in the widget, in the Search section, type the text to search for, then do one of the following:
To highlight the rectangles whose attributes match the text, clear the Filter check box.
To display
only the rectangles whose attributes match the text, select the Filter check box.
Click Search.
If a match cannot be found, a message is displayed at the top of the widget.
To clear the search results, click the X
at the top of the widget.
You can dock and undock the Interactive dialog box. A docked dialog box is attached to the right side of the widget and cannot be moved. An undocked dialog box can be moved and resized.
To dock it, click the Dock icon at the top of the dialog box.
To undock it, click the Undock icon.