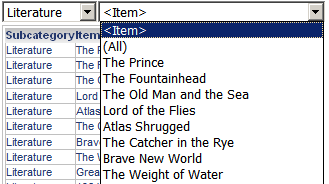
You can create a selector that targets another selector. In essence, the source selector filters the target selector. For example, in the image below, the selector on the left contains a list of book categories and the selector on the right contains a list of individual books. When the user selects Literature from the selector on the left (the source selector), the selector on the right (the target selector) is updated to display only books that fall under the Literature category, instead of displaying a long list of every available book.
This procedure assumes that you have already created a document with:
A Grid/Graph or panel stack.
A selector that targets the Grid/Graph or panel stack. This will be the target selector.
This procedure assumes that automatic target maintenance is disabled. If you want to keep automatic target maintenance, place the target selector on a panel stack in the same document section as the source selector instead. The source selector will automatically target the panel stack, and update the target selector.
Open a document in Design or Editable Mode.
From the Tools menu, select Document Properties. The Properties dialog box opens.
From the left, click Layout.
Clear the Automatically maintain targets for all selectors in this layout check box.
Click OK to return to the document.
On the Insert menu, point to Selector, then choose the selector style you want to use to display the selector. When you move the cursor to the Layout area, the pointer becomes crosshairs.
Click in the section of the Layout area in which you want to place the selector. If you click and drag in the section, you can size the selector.
Right-click the selector and choose Properties and Formatting. The Properties and Formatting dialog box opens.
From the left, click Selector.
From the Action type drop-down list, choose Select Attribute element.
The Source list contains all of the attributes in all of the datasets in the document. From the Source drop-down list, select the attribute to use as the Source of the selector. The elements of this attribute will be displayed as items in the selector.
From the list of Available targets on the right, choose the target selector and click > to add it to the list of Selected targets.
Select the Grid/Graph or panel stack
and click > to add it to the
list of Selected targets. You
can also add other Grid/Graphs and panel stacks as targets as well.
Note: If you did not disable automatic target maintenance, the
Available targets and Selected targets lists are not available. Click
Manual Targets, and select OK at the prompt to continue. The lists
are now available. You can remove any Grid/Graphs and panel stacks that
were added as Selected targets when automatic target maintenance was enabled.
To do this, select them in the Selected targets list and click <.
Now that you have created the selector, you can modify properties, such as multiple selections and simultaneous display of selector items, and format it.
Related topics