You can display reports as custom widgets in MicroStrategy Web, or as widgets when displayed on an iPhone or iPad with MicroStrategy Mobile.
Custom widgets can be created using the MicroStrategy SDK. To create custom widgets in MicroStrategy Web, you must own a MicroStrategy SDK license. For information, contact your Account Executive or email MicroStrategy directly at info@microstrategy.com. Certain custom widgets are also included out of the box with the MicroStrategy SDK. For more information about custom widgets and their use, see the MicroStrategy SDK documentation.
For a list of iPhone and iPad widgets, as well as instructions to display a report as a specific iPhone or iPad widget, see About iPhone and iPad widgets.
The Custom Visualizations Editor must be enabled before it can be used. For more information, contact your Web administrator.
Click the name of the report to run it.
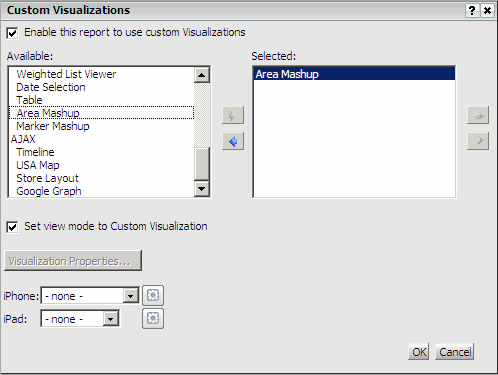
From the Tools menu, select Custom Visualizations. The Custom Visualizations Editor is displayed.
To display a report as a custom widget, complete the following steps:
Select the Enable this report to use custom visualizations check box.
Select
the widgets that you want to use for the report in the Available
list. You can hold CTRL and click
to select multiple widgets.
The first widget in the Selected
list is the widget displayed in the document by default. However, if you
add at least two custom widgets to the Selected
list, you can quickly switch between which of these widget types to use
to display the widget.
Click the right arrow to move the widgets into the Selected list.
Sort the widgets by selecting one, and clicking the up or down arrows to change their order. The first widget in the list is the default widget, and is applied to the report when you display the report as a widget for the first time.
Select the Set view mode to custom visualization check box.
You can specify additional options for a custom widget, such as whether to use images or colored bubbles to mark locations in a Marker Mashup widget. Click Visualization Properties, select the desired options, then click OK. For more information on the options available, see Marker Mashup Properties dialog box.
To display a report as an iPhone or iPad widget, complete the following steps:
To display the report as a widget on the iPhone, from the iPhone drop-down list, select the widget you want to use to display the report.
To display the report as a widget on the iPad, from the iPad drop-down list, select the widget you want to use to display the report.
You
can specify additional options for certain iPhone and iPad widgets, such
as the number of columns displayed in an Interactive Grid widget, or the
type of map marker used to display locations in a Map widget. Click the
Widget Properties icon  ,
then specify the desired options and click OK.
For more information, including a list of iPhone and iPad widgets and
the options available for a specific widget, see
About
iPhone and iPad widgets.
,
then specify the desired options and click OK.
For more information, including a list of iPhone and iPad widgets and
the options available for a specific widget, see
About
iPhone and iPad widgets.
Click OK to save changes and return to the report.
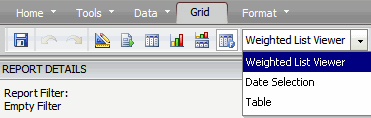
If you add at least two custom widget types to a report, you can quickly switch the display of the report to a different widget type. For example, a custom widget is displayed as a Table widget. You can choose to switch the display to a Weighted List Viewer widget by selecting Weighted List Viewer from a drop-down list, as shown in the image below.
To change the widget type to use to display the report, click the Grid tab. From the drop-down list in the report's toolbar, select the widget type to display.
Related topics